Ad- This is a collaborative post with Rug Doctor however, all thoughts and opinions are my own. We recently had the opportunity to work with Rug Doctor focusing on their home delivery rental service. I…
Ad/gifted products- I received the clothing in this post in exchange for the purpose of this review, all thoughts and opinions are my own.
I spend a lot of time in my comfortable clothes, they’re a staple for me, a must-have. I would spend all day every day in them if I could and since we have nowhere to go at the moment, that’s exactly what I have been doing. I have put on some weight since not having anywhere to go and my routine being chucked out the window so not a lot fits me at the moment. Its my fault though because I love nothing more right now than sitting in front of the television in the evening once the kids have gone to bed, wearing comfy clothes with my partner, surrounded by snacks ( good and bad ) whilst I watch a film or binge-watch a series on Netflix. Femme luxe recently got in touch and have kindly sent me a selection of their loungewear clothes for me to try out at home.
First of all, I should mention that they have a fantastic range of clothes for all different occasions. The first place I got to on any clothing website is the Loungewear section and Femme Luxe did not disappoint. One thing I really wanted to test out when reviewing loungewear is the wear on the knee’s, some leggings stretch in the knee area if you are sitting in a certain position for too long and do not regain their shape again. This didn’t happen with any of the bottoms I have received.
I picked this set out in this particular colour because it’s not what I would usually go for. First of all, it’s not black, most of the time I pick black because It’s an easy colour that goes with everything and will hide everything, so this is why I went out of my comfort zone and picked Rose. I love everything about this set, the colour, the style, the fit, it’s a very flattering set to wear because of its boxy look and I wouldn’t think twice about wearing this to pop out to the shops, it’s cute.
The next set I picked is this one below, its a tracksuit style set and the bottoms have pockets, gotta love pockets. It’s so comfortable to wear and I do wear this one the most.
The great thing about loungewear is that you can mix and match with them and Femme Luxe has a fantastic range of joggers to choose from, I love the cuffed joggers everyone is wearing right now, I can see myself having them in every colour, plus they look amazing paired up with one of their slogan T-shirts or a cute little crop top. I love everything about this look, especially the colour of the joggers.
The last loungewear set that I have picked from their website was this set in the colour camel. It is worth noticing that the material on this set is different to the other two. I did experience bobbling to the upper inner thigh (where you would expect chub rub) after only wearing for a few hours This one is more figure-hugging than the other two. It fits your body really lovely and I think it’s a very flattering set to wear. The leggings are high waisted which is great for mum tums like mine and the top is a long-sleeved V-neck.
I am so pleased with the selection of loungewear clothes that I have picked, they don’t make me feel frumpy, they make me feel good and I do really feel comfortable wearing them. I love that I can do the housework in them and still feel like I have got dressed and ready for the day ahead which is great for my mental well-being right.
Femme Luxe also offer Next day delivery FREE if you spend £30+ If you haven’t checked their website, what are you waiting for? I guarantee that you will find something you like.
I rave about Frenchic every single day. In fact, I don’t think there’s a single day that goes by where I haven’t mentioned it. It’s the creme de la creme of furniture paint.
First of all, let me tell you a little bit of background information about the lady who founded and started Frenchic.
Frenchic’s founder
Pam has always enjoyed painting furniture with chalk paint but she wanted paint that would tick all the boxes, she wanted paint that was safe to paint children’s toys, with no odour and that didn’t have to be stirred, shaken or that needed water adding to it.
In 2014 Pam gambled her £15,000 life savings to set up Frenchic. She did everything herself in the first year, She packed the orders, sent them, ordered new stock and brought in new stockists. Her kitchen was covered inboxes. After her first year, she turned her husband’s chiropractors clinic into Frenchic HQ and they’ve even had to move warehouse FOUR times to keep up with demand.
Her chalk paint business now is worth £16m and I am not surprised. Go, Pam!
Frenchic – Why I love it and what I have used it on so far.
I have also always enjoyed painting furniture throughout the years, I had previously used a different brand of chalk paint which I wasn’t completely satisfied with. I didn’t like the odour or the finish and was limited with colours. I remember seeing my friends pictures on Facebook of her painting her tv unit in this amazing blue colour and asked her what she used, Frenchic, of course!
I did a search on Facebook and joined their fan forum and that was it, I was blown away by it all and the finish on the furniture looked incredible, I had to try it. You can buy it directly from their website or from your local stockist. Just go on Frenchic’s website, type in your postcode it will tell you who your closest stockist is.
I remember the first time I opened the tin and I could already see by the consistency that this was going to be amazing and I wasn’t wrong. The coverage is second to none and it goes on like a dream with barely any prep work needed. ( I say barely because I do like to do a little even though you don’t need to with this)
At first, I thought the paint was expensive but that was before I started to use it.
Since discovering Frenchic I have painted all sorts and I can tell you that it does go a long way and I can also tell you how much I have used and what I have done.
Dusky Blush 750ml and 150ml
x2 coats on my front door
x2 coats on my outside light lantern
x2 coats on my grandfather clock
x2 coats on my bike
x2 coats on my rattan planter
Dazzle me 750ml ( Whitest white)
X2 coats on my dressing table
Garden signs
x 2 coats on all of my downstairs skirting board and has really brightened them up
I still have most of the tin left.
Dazzle me 750ml
x2 coats on another grandfather clock project
x2 coats on a corner unit which I then sold on.
I still have most of the tin left.
Wise old sage 150ml
I used this one on little details in my garden like signs and little ornaments.
I have also used the copper frensheen which is a powder that you mix with a finishing coat to create a metallic look. Although I have not used this on furniture yet, I have used it on my daughter’s school projects and I will be using it on my bike to add some detail. It mixes beautifully and goes on an absolute dream.
There are so many different ranges to try which offer different shades of colour but I have only ever used the Alfresco and Frensheen.
Original Artisan range
The Lazy Range
Alfresco inside/outside range
Chalk wall paint
Trim Paint
Easy Crackle
Waxes
Then you can buy brushes stencils Frenhsheen, finishing coat, sugar soap etc
There are endless projects you can do with this paint. I have seen people paint their window fascias, fireplaces, garage doors, kitchen cupboards, floors, garden slabs, rattan furniture, light shades, sofas, chimineas, sofas, blinds, radiators and so much more.
I have seen people transform rooms from boring, dated and dull to exciting, clean, fresh and vibrant with just a tin of this stuff, it’s actually insane and deserves to be shouted about.
During the first lockdown, people spent their time either redecorating their homes, painting their fences or doing their gardens up. I was going to repaint my fence but could I for the life of me find blooming fence paint? nope! I was bored and wanted to learn something new but nothing was jumping out at me until I put a new wax melt in my burner. I had always wanted to make candles before but never knew where to start.
My friend even bought me a candle making kit for Christmas and when I had researched into it, it wasn’t as straightforward as I thought it would be. I thought all you would need to do is melt the wax, add the scent, pour it into a mould and leave it to set and voila! Nope!
There are many different waxes you can buy and they all meltdown at different temperatures and they need to be at a certain temperature when adding things like your colour and your fragrance oil and don’t get me started on CLP labels if you are wanting to go on to sell your creations.
After a short, while I got the hang of making them, so I thought I would create this “how-to” to help others who have a love for wax melts and want to give it a go themselves.
This is just how I make them but there are many different methods you can use.
Things you will need to get started:
A metal jug -I got mine for a quid in Asda
Scales
lollypop sticks – These make great stirrers.
A digital thermometer – I brought mine from Amazon
Wax – For wax melts you will need a type of wax specifically for melts and if you want to make candles you will need to buy container wax.
Fragrance oil – There are so many different scents out there.
Moulds – I use silicone as they are easier to remove the wax once its set.
Mica powder, liquid, chips – This is what you use to change the colour of the wax, I use powder and chips.
Cello bags – to package your melts in afterwards
When making wax melts you should use the ratio of 100g of wax to10ml of fragrance oil and you should always weigh your fragrance oil because some are heavier than others. For example, if you are making a bigger batch and are melting 500g of wax then you can add 50ml of fragrance oil.
I use the double boil method which means I add the measured wax to the metal jug and sit it inside a pan of boiling water and melt it down this way. Some people use slow cookers and soup makers but I have no idea how to do it that way.
Step by step:
Measure your wax – I use golden wax 494.
Measure out your fragrance oil. I use an egg cup.
Fill your kettle up, boil it and add it to a saucepan. Place your metal jug with the wax in inside it.
Use your lollypop stick to stir the wax as it’s melting down/
I remove the wax jug from the heat when the temperature hits around 80
Add a little bit of the colouring. Dont add to much or your finish piece will have little holes in where the colour has sat and set.
When the temperature gets down to around 70 I pour in my 10ml of fragrance oil and stir for two minutes.
Pour the wax into the moulds when the temperature is around 65-60 and leave it to set. – I leave it over night to make sure its set properly.
With the type of wax I use, it’s prone to frosting which happens when hot wax is poured into a mould that isn’t quite at room temperature. It looks like little specks of frost but it doesn’t affect the smell of the wax melts at all, it just looks a bit different. Some people pop their silicone moulds in the oven to warm them up before pouring them, I only make them for myself so only do this when I can be bothered.
With Golden wax 494, the cold scent throw is amazing but, you do need to leave them to cure for two weeks before burning them which can be a right faff. When I made my first batch I was so excited to burn one because it smelt incredible, but the hot scent throw was very weak. I left the rest of them in a tub in a cupboard for the next two weeks and when I went back to them they were a hundred times better and the hot scent throw was much stronger.
When storing your wax melts, make sure they are in an airtight container with a label on the box so you don’t mix them up or you can package them straight into a cello bag. I usually pop a sticker on stating which scent it is as I only make for myself.
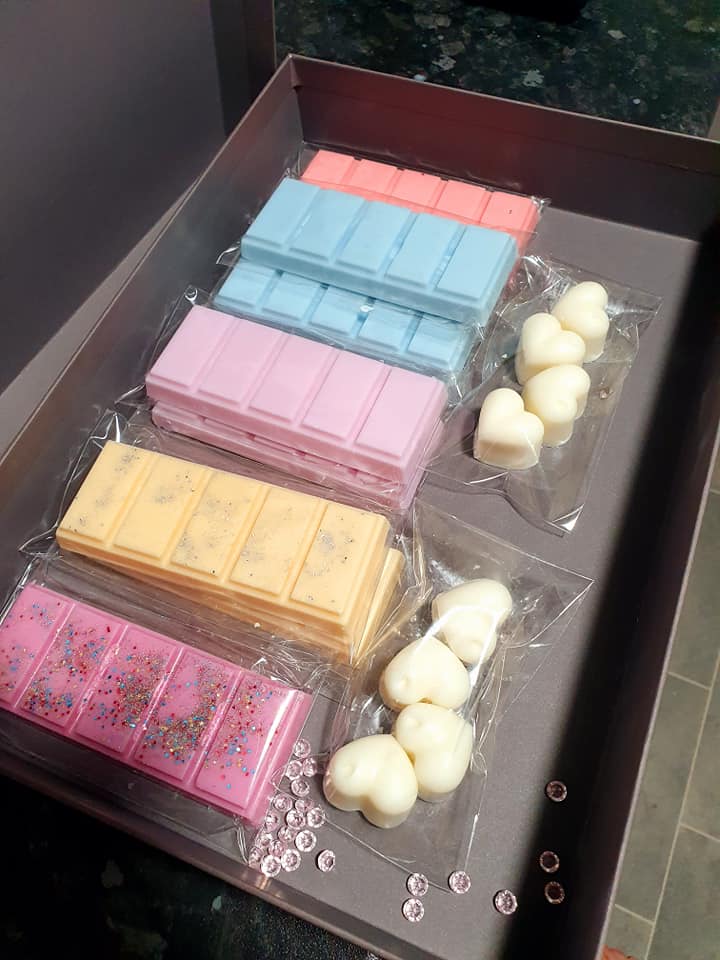
Some of the wax melts that I have made
The legal stuff- Clp and warning labels and where to get them:
When making candles and wax melts and you are planning to give them to family and friends or sell them then you must be CLP compliant. What the heck does this mean you ask?
You can read all about CLP and warning labels here. The website where you buy the fragrance oil will have its own CLP information on each fragrance for you to download if you want to make your own labels, but make sure you get the correct website that your fragrance oil comes from.
There are so many different waxes out there to choose from all with different temperatures that work well with that particular wax. So my advice is to play around and find what works best for you, this is just what works for me.
These are just a few of the main suppliers:
Craftovator
Craftastik
Stansteads
Supplies for candles
Livemoor
Stansfield
Truly Personal
Fizzy whizz
CLP stickers – I use a lady on Facebook called Labels by Rebecca. You can also make them yourself using a website called Avery.
There you have it, it is literally trial and error and can take a long time to perfect them but give it a go and let me know in the comments how you get on.
People love receiving wax melts as gifts and they make fantastic thank you gifts for teachers, check out my other thank you gifts for teachers.
You are here because the subject of this blog post interests you, doesn’t it? I am not going to lie and tell you that this is what I have always done to stay on top of my kitchen because that’s utter crap. I have a small kitchen with minimal storage space so if I don’t stay on top of it, it becomes messy and cluttered very quickly. – to the point where, if I don’t stay on top of it, I might need to call someone like these arkansas exterminators out to deal with any unwelcome visitors who have made their home among the clutter.
It has only been recently where I have gone through my kitchen and really sorted it out, these are just 11 things I have done to help me which I hope might help you to.
Remove everything from the kitchen that does not belong in there.
Sort and rearrange drawers and cupboards and donate or bin things that you don’t need or use anymore.
Clear worktops and try to keep them clear.
Stay on top of the recycling rubbish. I don’t have space in my kitchen for a recycling bin nor can I be bothered to take every piece of recycling to the big green bin outside every time I open something new. I used to let this pile up before taking it out but now I do it at lunchtime and after dinner and it makes a big difference.
Wash up as you go along if you do not have a dishwasher, not only does it save you from doing a huge lot at the end of the day but it also keeps your sides clear.
Use storage baskets for the top of wall cupboards to hide away anything you don’t have space to store things elsewhere. We have baskets for all sorts like batteries, charging cables, my sharpies pens so they are well away from the kids.
I keep my laundry basket in my downstairs loo which gives me more floor space in the kitchen.
Keep windowsill clear of clutter, I am notorious for putting stuff on mine and not clearing it, I am getting better with it now.
If you have space, buy a microwave shelf and fix it to the wall to free up some workspace. We only use ours to make porridge, popcorn and beans and it takes up a lot of space. This is something we are planning on doing.
As soon as the washing is done, fold it up, take it upstairs and put it away. Try not to let washing pile up as I think clothes are the main focus of a cluttered looking house. I try my hardest to stay on top of this and when I do, it really helps keeps the flow of laundry at a manageable pace, it also helps keep the kid’s bedrooms tidier and stops them from asking you where so and so is.
I brought a kitchen trolley for extra storage. It has allowed me to remove things from my worktop and organise them neatly somewhere else. I would recommend this if you have minimal storage but space to put one.
Do not print this out and put it on your fridge. It will look cluttered LOL I am joking, I love having my kids artwork on my fridge but it does look cluttered.
We use cookies to ensure that we give you the best experience on our website. If you continue to use this site we will assume that you are happy with it.